Create a SharePoint Framework client-side web part

Assume we’re using v1.15.2 of the SharePoint Framework Yeoman generator.

Open a command prompt and change to the folder where we want to create the project.
Run the SharePoint Yeoman generator by executing the following command:
yo @microsoft/sharepoint

Use the following to complete the prompt that is displayed:

What is your solution name?: HelloWorld
Which type of client-side component to create?: WebPart
What is your Web part name?: HelloWorld
Which template would you like to use?: No framework
After the generator scaffolds the folders required for the project, the generator will install all the dependency packages using npm.

When npm completes downloading all dependencies, ensure the developer certificate is installed by executing the following command:
gulp trust-dev-cert

Run the project by executing the following command:
gulp serve –nobrowser
The SharePoint Framework’s gulp serve task with the nobrowser switch will build the project and start a local web server. Wait for the reload subtask to finish executing. At this point, the web part will be ready for testing.

Open a browser and navigate to any SharePoint site in your tenant. If prompted, sign in using your Work or School credentials. Append the following to the end of the site’s URL: /_layouts/workbench.aspx. This is the SharePoint-hosted workbench.

Screenshot of the SharePoint Workbench

Select the web part icon button to open the list of available web parts, scroll down to the Advanced section, and select the HelloWorld web part:
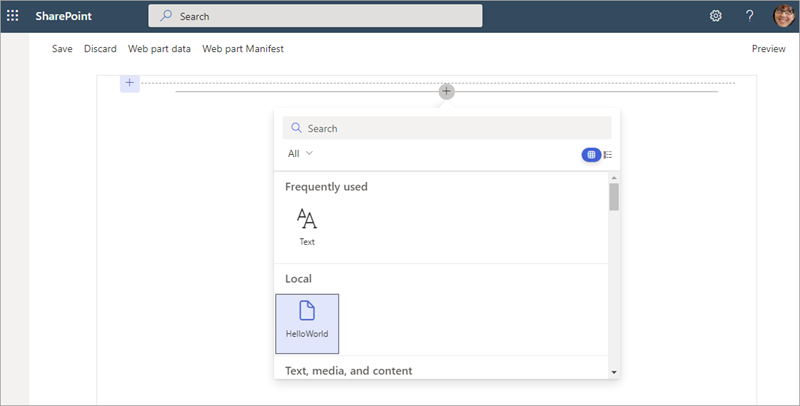
Screenshot of adding the HelloWorld web part

Edit the web part’s properties by selecting the pencil (edit) icon in the toolbar to the left of the web part:
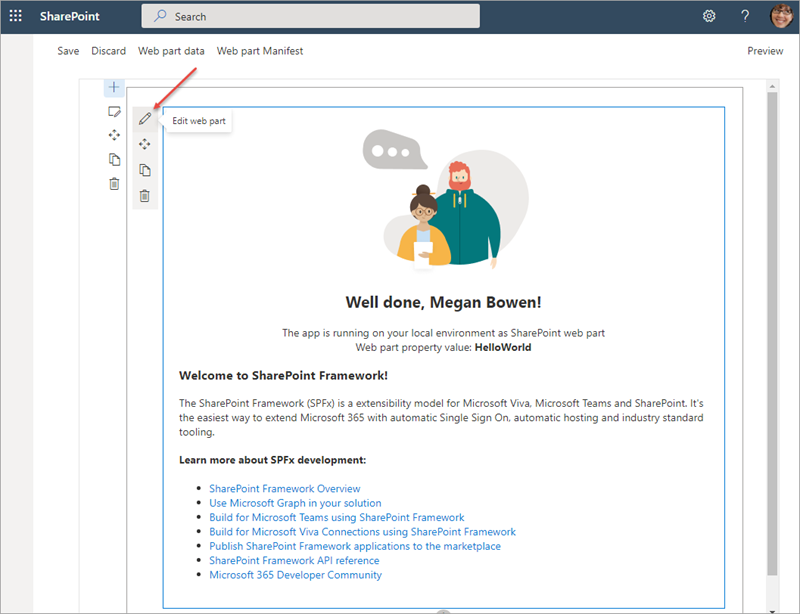
Screenshot of the web part edit toolbar

In the property pane that opens, change the value of the Description Field. Notice how the web part updates as you make changes to the text:
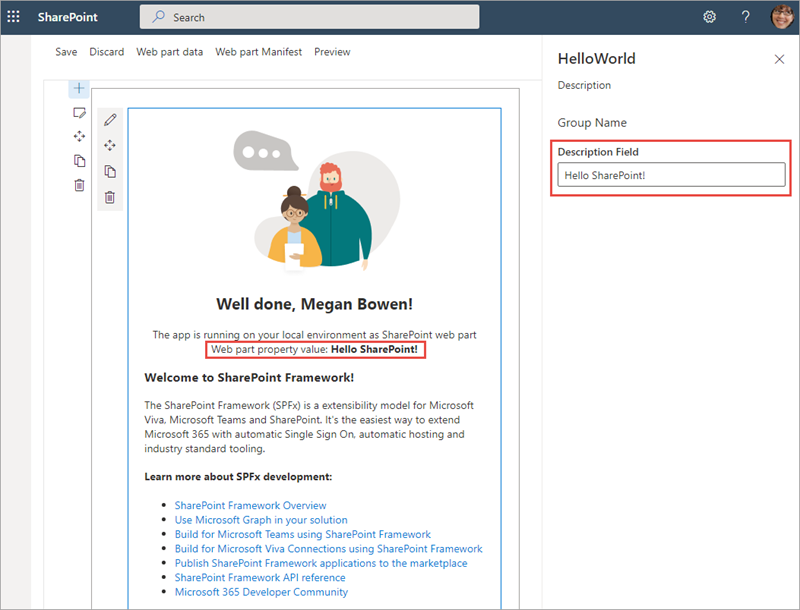
Screenshot of editing the web part property pane

Update the web part code

Open the project folder in Visual Studio Code.

If the local web server isn’t running, start it by running gulp serve –nobrowser on the command line from the root folder of the project, and add the HelloWorld web part to the SharePoint Workbench.

Next, update the code in the render() method to add a button that responds to an event.

Locate and open the file src/webparts/helloWorld/HelloWorldWebPart.ts.

Within this file, locate the render() method. Locate the following lines:

<h4>Learn more about SPFx development:</h4>
<ul class="${styles.links}">
  <li><a href="https://aka.ms/spfx" target="_blank">SharePoint Framework Overview</a></li>
  <li><a href="https://aka.ms/spfx-yeoman-graph" target="_blank">Use Microsoft Graph in your solution</a></li>
  <li><a href="https://aka.ms/spfx-yeoman-teams" target="_blank">Build for Microsoft Teams using SharePoint Framework</a></li>
  <li><a href="https://aka.ms/spfx-yeoman-viva" target="_blank">Build for Microsoft Viva Connections using SharePoint Framework</a></li>
  <li><a href="https://aka.ms/spfx-yeoman-store" target="_blank">Publish SharePoint Framework applications to the marketplace</a></li>
  <li><a href="https://aka.ms/spfx-yeoman-api" target="_blank">SharePoint Framework API reference</a></li>
  <li><a href="https://aka.ms/m365pnp" target="_blank">Microsoft 365 Developer Community</a></li>
</ul>

Replace them with the following:

<button type="button">Show welcome message</button>

Next, add the following code to the end of the render() method. This will wire up some code to the click event on the button and display an alert on the page.

this.domElement.getElementsByTagName("button")[0]
  .addEventListener('click', (event: MouseEvent) => {
    event.preventDefault();
    alert('Welcome to the SharePoint Framework!');
  });

Save your changes. Wait a few seconds for the gulp serve task to rebuild your project, and then refresh the SharePoint Workbench so that you can test them.

Select the Show welcome message button.

Notice the button triggers a JavaScript alert displaying the message you added in the above code.

Close the browser and stop the local web server by pressing CTRL+C in the command prompt.

Update the web part’s properties

Now change the properties of the web part to give it a new name, description, and icon.

The web part’s metadata is found in its manifest file.

Locate and open the file src/webparts/helloWorld/HelloWorldWebPart.manifest.json.

In the section preconfiguredEntries, locate the following lines:

JSONCopy

"preconfiguredEntries": [{
  ...
  "title": { "default": "HelloWorld" },
  "description": { "default": "HelloWorld description" },
  "officeFabricIconFontName": "Page",
  ...
}]

Change the web part’s title and description to something different.

The web part’s icon is the name of one of the icons listed in the Office UI Fabric, located here: https://developer.microsoft.com/fabric#/styles/icons. Pick one and update the officeFabricIconFontName property:

JSONCopy

"preconfiguredEntries": [{
  ...
  "title": { "default": "Hello SPFx" },
  "description": { "default": "My first SPFx web part" },
  "officeFabricIconFontName": "BirthdayCake",
  ...
}]

Start the local web server using the provided gulp serve task with the nobrowser switch:

ConsoleCopy

gulp serve --nobrowser

Wait for the reload subtask to finish executing, then open or refresh the SharePoint Workbench. This time, when you hover the mouse over the web part in the toolbox, you’ll see the changes you applied to your web part:
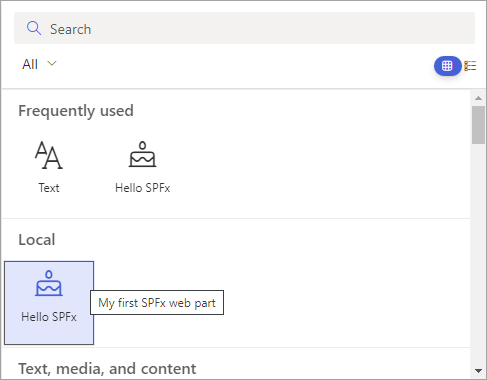
Screenshot of the web part gallery

Reference

OOP SOLID Design principles

S — Single Responsibility Principle (known as SRP)

The name itself suggest that the “class should be having one and only one responsibility”.

O — Open/Closed Principle

This principle suggests that “classes should be open for extension but closed for modification”

L — Liskov’s Substitution Principle

This principle suggests that “parent classes should be easily substituted with their child classes without blowing up the application”. In other words every subclass or derived class should be substitutable for their base or parent class.

I — Interface Segregation Principle

This principle suggests that “many client specific interfaces are better than one general interface”. In other words a client should never be forced to implement an interface that it doesn’t use, or clients shouldn’t be forced to depend on methods they do not use.

D — Dependency Inversion Principle

This principle suggest that “classes should depend on abstraction but not on concretion”. The Dependency Inversion Principle (DIP) states that high-level modules/classes should not depend on low-level modules/classes. Both should depend upon abstractions. Secondly, abstractions should not depend upon details. Details should depend upon abstractions.

Configure your SharePoint Framework development environment

Install Node.js

Node.js is available in two different releases: the long term support release (aka: LTS) is the most stable version that is recommended for most users while the current version contains the latest features. 

Before installing Node.js, you should verify that you haven’t installed it previously. Open a command prompt or terminal (depending on your developer platform) and execute the following command:

node -v

If a version number is returned, you already have Node.js. The version(s) of Node.js you may use depends on the environment(s) you’ll be targeting.

SharePoint Online always uses the latest version of the SharePoint Framework, but SharePoint 2016 and SharePoint 2019 only support the versions that match the server-side dependencies of the deployed packages.

SharePoint versionSupported SPFx versionSupported features
SharePoint OnlineAll versionsAll features
SharePoint Server Subscription Editionv1.4.1 or lowerSPFx client-side web parts in classic and modern pages, and extensions in modern pages.
SharePoint Server 2019v1.4.1 or lowerSPFx client-side web parts in classic and modern pages, and extensions in modern pages.
SharePoint 2016 Feature Pack 2v1.1SPFx client-side web parts hosted in classic SharePoint pages.

For more information about SharePoint Framework development with SharePoint 2016 Feature Pack 2 and SharePoint 2019, see:

SPFx development environment compatibility

As each new version of the SharePoint Framework is released, support for newer versions libraries is constantly added to ensure that the toolset remains up to date.

The following table lists SharePoint Framework and compatible versions of common tools and libraries:

SPFxNode.js (LTS)NPMTypeScriptReact
1.16.1v16.13+v5, v6, v7, v8v4.5v17.0.1
1.16.0v16.13+v5, v6, v7, v8v4.5v17.0.1
1.15.2v12, v14, v16v5, v6, v7, v8v4.5v16.13.1
1.15.0v12, v14, v16v5, v6, v7, v8v4.5v16.13.1
1.14.0v12, v14v5, v6v3.9v16.13.1
1.13.1v12, v14v5, v6v3.9v16.13.1
1.13.0v12, v14v5, v6v3.9v16.13.1
1.12.1v10, v12, v14v5, v6v3.7v16.9.0
1.12.0v12, v10v5, v6v3.7v16.9.0
1.11.0v10v5, v6v3.3v16.8.5
1.10.0v8, v10v5, v6v3.3v16.8.5
1.9.1v8, v10v5, v6v2.9v16.8.5
1.8.2v8, v10v5, v6v2.9v16.7.0
1.8.1v8v5, v6v2.7, v2.9, v3v16.7.0
1.8.0v8v5, v6v2.7, v2.9, v3v16.7.0
1.7.1v8v5, v6v2.4v16.3.2
1.7.0v8v5, v6v2.4v16.3.2
1.6.0v6, v8v3 (w/ Node.js 6),
v5 (w/ Node.js 8)
v2.4v15
1.5.1v6, v8v3 (w/ Node.js 6),
v5 (w/ Node.js 8)
v2.4v15
1.5.0v6, v8v3 (w/ Node.js 6),
v5 (w/ Node.js 8)
v2.4v15
1.4.1v6, v8v3, v4v2.4v15
1.4.0v6v3, v4v2.4v15
1.3.0v6v3, v4v2.4v15
1.1.0v6v3, v4v2.4v15
1.0.0v6v3v2.4v15

If you already have a version of Node.js that’s compatible with the environment(s) you’ll be targeting, then skip to the next section.

Open a browser and navigate to the Node.js Foundation site: https://www.nodejs.org. The current LTS version may not be compatible with the current version of the SharePoint Framework, so you’ll navigate further into the site to ensure you download the appropriate installer. Select Downloads from the top menu navigation then scroll to the bottom of the page and select Previous Releases. Download the appropriate installer or binary for the platform you’re using. Run the installer, accepting all the default options. This will install Node.js and npm Node Package Manager.

Install Yeoman

Yeoman is a scaffolding engine, which executes generators that prompt the user with questions. Based on the answers to these questions, Yeoman then creates the folders and files defined by the generator.

Open a command prompt / terminal window and execute the following command to install Yeoman globally with npm:

npm install –global yo

Install Gulp CLI

Gulp is a task runner utility. It’s similar to MSBuild, a tool used by .NET developers and Visual Studio to compile projects, package solutions, and start a debugging experience.

If you previously installed Gulp globally, you need to uninstall it before installing Gulp CLI

npm uninstall –global gulp

To install Gulp CLI, open a command prompt / terminal window and execute the following command:

npm install –global gulp-cli

Install the SharePoint Framework Yeoman generator

Microsoft has created a Yeoman generator for scaffolding SharePoint Framework projects.

To install the latest version of the SharePoint Framework Yeoman generator globally with npm, open a command prompt / terminal window and execute the following command:

npm install –global @microsoft/generator-sharepoint

To install a specific version of the SharePoint Framework Yeoman generator globally with npm, open a command prompt / terminal window and execute the following command:

npm install –global @microsoft/generator-sharepoint@[version number]

npm install –global @microsoft/generator-sharepoint@1.9.1

Final Check to list all that we have installed:

npm list -g –depth=0

Reference 1